***To cut straight to the video, scroll to the bottom of the post***
I’m an app fan, especially if its photography or video related. So when I heard that Instagram had released Hyperlapse, I had to give it a try. Hyperlapse is Instagrams foray into the world of time-lapses. Traditionally with a time-lapse, you generally have to set your camera up on a tripod or motorised slider, use an intervalometer or something of that nature to take the shots/video…and then speed it all up in post. The footage is beautifully smooth and crisp. There hasn’t really been a mobile solution for time lapses. Luckily, this is where Hyperlapse comes into play.
Instagrams description on the app store sums the app up perfectly
“When you shoot a time lapse video with Hyperlapse, your footage will be instantly stabilized to smooth out the bumps from the road and give it a cinematic feeling. Capture an entire sunrise in 10 seconds—even from the back of a moving motorcycle. Walk through the crowds at an all-day music festival, then distils it into a 30 second spot. Capture your bumpy trail run and share your 5k in 5 seconds.”
Having briefly played with the app, I decided I wanted to see how far you could take it. Could you film a wedding highlights reel on the app, then piece it together afterwards into something half decent? Well, yes and no.
I do shoot the odd wedding video here and there, and I tend to film 10-30 second clips and then piece these all together into a highlights reel across the day. Hyperlapse seemed perfect for this, as it would take these short clips and condense them even further. Carla and Nick agreed to let me try this out at their wedding that I was photographing at The Knowle in Kent, UK. Given that I couldn’t realistically hold a phone and a camera without sacrificing quality of the photos. I bought a small phone tripod and a hot shoe mount with a screw on the top. I took the tripod apart and screwed the “head” from the tripod onto the hot shoe mount and voilà, I had an on board phone holder for my Nikon D800. Granted I am sure there are dedicated gadgets out there already that do this, however I like to be awkward.
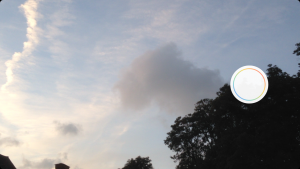
Using the app – The app itself is pretty simple to use. Tap an area of the screen to set your focus point and exposure, then hit the record button and away you go. If the app thinks you don’t have enough light, it will give you a little warning message and ask you to either shoot somewhere brighter, or tap the record button again to start recording. It’s nice that it gives you a warning, but it means that you do miss out on recording straight away as you have to tap it again to start it. As you record, the footage will look like standard issue shaky mobile phone footage, it’s after you stop that the magic happens. When the clip starts playing back, it will default to 6x speed, you then have the option to slide the speed slider
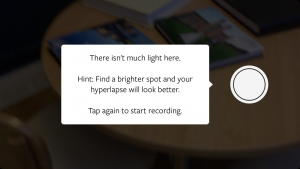
When it came to the reception and dancing action of the wedding, I knew that the iPhone 5s camera wasn’t going to be able to handle the low light action and I would be faced with the “There isn’t much light here” warning message in Hyperlapse.
To get around this, I broke out my Yongnuo 300 led video light and lit the subjects that I was filming. Although you lose some of the ambience, it was the only way I could get around it. There was no option to turn on the in camera LED light whilst using Hyperlapse. A function that should probably have been included.
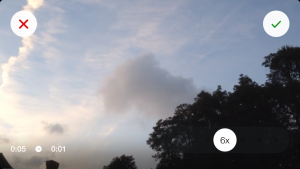
The editing of the Hyperlapse is pretty simple enough. The clip will play back at 6x speed and gives you the option to move the slider to the speed you want the clip to play back at. 1x, 2x, 4x, 6x, 10x and 12x are your speed options. As you increase or decrease the speed, the final clip length is displayed in the bottom left hand corner of the screen so you have an idea of how long your final clip will be. Once you’re done, hit the tick.
This is the point that Hyperlapse comes into its own. Through some super clever trickery, you’ll see that although your shaky footage isn’t entirely without shake, it sure as hell is a lot smoother than when you were filming it and is most impressive. I’ve seen some footage of a guy on a push bike using Hyperlapse and that footage was smooth as anything. In fact, I’ve used a car mount of my iPhone and filmed and it did a pretty good job of smoothing out jolts from bumps in the road.
For the purposes of my wedding hyperlapse, I wanted to keep all the action at the same speed. In retrospect, I kind of wish I had slowed down some of the dancing action as it looks pretty comical. Once you have saved your hyperlapse, you cant go back into it to change the speed, so you need to decide before you save it. Walking around a static object such as a car and running the app, almost gives a pseudo bullet time effect which is pretty cool. The issue I did find, was that with no real way to control exposure, or any kind of transitioning from dark to light areas, if you hit a patch of sunlight in your background, the whole look of it was a bit patchy
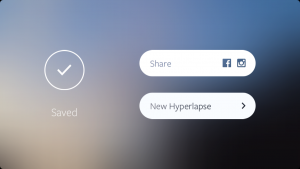 Naturally, Hyperlapse has social sharing built into it. Your options are are Facebook, or instagram. The clip will automatically save to your camera roll, all ready for you to either share or edit.
From this point, I used iMovie on the iPhone, and pulled the clips in. Given the way I was taking short snippets across the day, it was pretty simple just to drag and drop them on to the timeline without really needing to cut them down at all.
Final thoughts – It’s definitely a fun app, there’s no denying that. The fact that I was able to shoot through out the day, pop it all in iMovie, and edit it all before I had even left the wedding was brilliant. I realise that you can do the same thing with GoPros and other small cameras, however you still have to then download everything to edit it and you don’t get that in app stabilisation that you do from Hyperlapse. It did of course hound my battery life on my phone. However I had pre-empted this would happen and took along a Pebble portable charger for the day to keep the phone topped up with battery life.
I did find that focussing was a bit of a nightmare at times. Things that I could focus on using the regular camera app, just wouldnt lock focus through Hyperlapse. I also kind of wish that the app would change its exposure as you shot, rather than having to tap the screen again if I moved from a light to a dark environment, but these are minor niggles.
Hyperlapse will never replace videographers at weddings, and that is anything but Instagrams idea behind the app. It’s meant to be a simple shoot and share app. However as a bit of a “fun” extra to share with my clients it was definitely worth using.
So, after all this talk let me share the final result. Although the footage was shot and cut together in Hyperlapse and iMovie, I added a soundtrack from The Music Bed, and the beginning and end cards on my Macbook Air and Adobe Premier Pro